
Social media, especially Facebook, can be daunting for a lot of church communities. For one reason or another, Facebook is overwhelming. Where do you start? What are your goals for your Facebook page? How do you get people to actually go to your page? What kind of content should you showcase? Who should you put in charge of your church Facebook page?
Lots of questions, and the right answer is always going to be unique to your community. But there is some general advice I can give! Hopefully this will be a great jumping off point for you as you begin your Facebook journey. Or for when you want to ‘check in’ with your process to see where you can improve or what you can change to make the best of the Facebook experience.
Step 1: Define your goals.
Depending on your community, your goals with your Facebook page might differ from other communities.
If your goal is to create an online space for members to interact, then awesome! The following steps will help you make sure you connect with your membership and can guide the content you include. Content can include:
- Creating events and inviting members to get an idea of attendance.
- Uploading photos from church events.
- Advertising classes, programs and other activities for membership.
- Sharing weekly sermons and/or recordings of the weekly sermon.
- Links to interesting articles or relevant content that your community would find meaningful and useful!
If your goal is to reach more potential members, advertise your church, promote your events and just generally grow, Facebook is also a great space for you too. Exploring paid advertising options that Facebook offers, especially once you get connected with your current community, can help your church grow. Understanding how to use Facebook to create reasonable call to actions will help you engage and grow! Consider paying to advertise an upcoming big event (Easter services, Christmas, VBS, etc) as a way to reach more people locally!
Once you know what your goals are, you can focus in on how best to use Facebook and what is the best use of your time.
Step 2: Create your community!
The easiest way to grow your community is to invite your contacts to view and like your page. Hopefully you have a list of emails of your members (if not, you really should!).
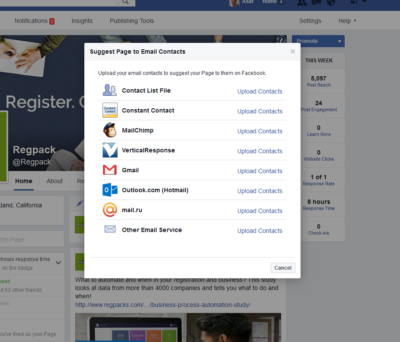
To invite email contacts, first go to your church Facebook page. At the bottom of your cover photo, you’ll see a “Share” button, click the “…” to the right of the word Share and then “Suggest Page”.
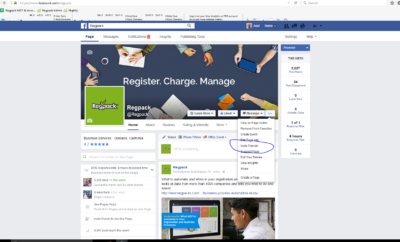
From there, you can choose how to import your contacts. If you use one of the services they include, do that!
Once you invite all your contacts and see some page likes coming through, make sure you start sharing some awesome content!
If your goal is to just engage with your current membership in an online space consider the following:
- Add photo albums with pictures from church events and activities. Maybe create an album with pictures of staff and volunteers to give them a shout out!
- Share articles you think your community would enjoy reading whether they be about parenting, spirituality, local events, etc. You know your community best and what issues they’d like to read more about.
- Have your community leaders pen posts – your priest, pastor, or other clergy might enjoy writing a weekly ‘thought’ or journal, you can share a web version of the weekly sermon, etc. If you have a blog, this type of content can go there and then you can share the link to blog posts on your Facebook page.
If your goal is to reach out and find NEW members, in addition to connecting with current membership, do everything I said above, but consider boosting your posts. This option costs money, it’s basically like a paid ad, but for a specific post, not your page. You can play with the settings for who the boost will show to to try and reach new people. Start by having the post show to ‘friends of your friends’ which would be all the friends of the people who follow you. You can hone in by location as well (since you’re a local community) or people who have certain interests that you think make sense for your community (God, Jesus, etc) that are also geographically close to you.
While this option comes with some trial and error on your part (what settings work, what doesn’t) and this can cost a little bit of money, it might be worth it. If you have the budget for advertising and want to reach out to people effectively, consider this. In the meantime, here’s a handy guide by Facebook on how to boost your posts.
No matter your goal, another great way to get the word out is just talking about it. Have a sign up in the front office encouraging members to like your Facebook page, mention it when talking with members that your calendar of events or sermons can be found online – on your website and/or on your Facebook page. Word of mouth is a tried and true recipe for success!
Step 3: Do all the ‘techy’ stuff
An extension of getting your page out there and noticed, like I briefly mentioned above, was adding Facebook to your website. All this means is adding a button somewhere on your home page. It is usually at the the top or bottom of your website. It will say “Like us on Facebook” or a Facebook image of some sort. When someone clicks it, will take them to your Church Facebook page. From there, they will check it out and hopefully like it!
Whoever does your website should easily be able to do this for you and if you are using a website template yourself, there is always a Facebook widget to add and it’s simple to use! When in doubt, find an awesome church member who can help you out! 🙂
Many times when people are looking for a new community, they will first go to your website or search on Facebook. Make yourself easy to find by including a link to your Facebook page on your website (and of course, by including your website on your Facebook page too!)
You also want to make sure when you create your Facebook page initially, that you set up it properly. Make sure your contact information is current and correct, you use great buzz words in your about me section so people know what you’re all about and what kind of community you are, and include your website, phone number, location, etc. Choosing great photos for your profile photo and cover photo is also important! Also make sure your page is always updated with your worship times. For some churches they are always the same, but some they are not, so make sure that at any given moment if someone is on your page, the information and times are correct. And make a special post if you are having a special service (Easter, Christmas, etc).
Consider sending out an email once your Facebook page is live to your members. Let them know you have a Facebook page and invite them to like it. You should also ‘invite’ everyone through Facebook’s tool like I explained in Step 2 above. But, let them know in a traditional email as well.
Consider also including the link to your Facebook page in your email signature and in church newsletters. All of this is true for Instagram as well, which is another great platform and connects up with your Facebook page easily.
Step 4: Use it!
Once you’ve invited everyone, made sure you advertised the page everywhere, decided on great content to post and set up your profile properly…the only thing left to do is…USE IT!
Take advantage of the event tool to create events and invite people. Create an online calendar so members and prospective members can see what’s coming up. They will also be reminded when the events are near. Facebook does this automatically when you invite people to an event. It also sends reminders to attendees automatically! Easy peasy!
No matter what kind of content you decide to post, make sure you post often. You can’t properly engage with your followers if there is nothing posted to engage with. If you post a photo album, tag the members in those photos so they are encourage to comment on them, share them to their friends and enjoy seeing them!
Think about asking questions as status updates to engage with members when they aren’t in church. Questions can be anything! What are favorite Christmas or Easter recipes around those times of year? Ask members to post a picture from the latest event. Ask philosophical questions and crowd source some great conversations! The options are endless!
Conclusion: 4 Steps to Creating a Great Church Facebook Page
Facebook shouldn’t be intimidating or daunting. You should have fun with it and go with the flow. Don’t be afraid to ask members what they’d love to see from Facebook. You want to make sure you aren’t wasting your time with content that isn’t interesting. Facebook can be as simple as becoming a platform to just share photos and add events. It can also be a huge part of your advertising and event promotion. If it seems like too much, or if you don’t feel “with it” enough to really get on board the Facebook train, reach out to your community! There are a lot of people who know how to use Facebook and would probably really enjoy the opportunity to showcase and represent the community they love so much!
Just remember to first define your goals and then move forward from there. Don’t feel like you have to “do” everything on Facebook if it doesn’t make sense.
Here are a few other great resources for getting Facebook “right” for your church.
Church Marketing Sucks: Getting Your Church Started With Facebook
Pastors.com: 7 Ways to Have a Great Church Facebook Page
Lifeway.com: A Checklist For An Effective Church Facebook Page