


Who doesn’t recall the thrills of summer camp? The anticipation, the excitement, the lifetime friendships, and the countless memories created; are experiences that form an eternal part of our developing years!
However, before all the campfire stories, crafts, field trips, and new friendships, there is one critical process that must be successfully navigated – summer camp registration. The registration process, which has significantly evolved over the years, plays a crucial part in kick-starting the summer camp adventure. Traditionally, the registration process involved physical sign-ups, lengthy queues, and stacks of paperwork. However, with the advent of digital technologies, registering for summer camp has been transformed into a much more streamlined and efficient procedure, mostly taking place online.
At the forefront of revolutionizing this procedure is Regpack. With our expertise in developing tech solutions that deliver impactful outcomes, we’ve remodeled the summer camp registration process. Moving beyond just sign-ups, we have designed an advanced system that enables organizations to manage not just registration, but a gamut of other event details. But before we delve into the specifics of our offerings, let’s first understand the importance and the benefits of an online registration form, particularly for summer camps.
The Concept of Online Registration for Summer Camp
Gone are the days when parents had to make a physical trip to sign their kids up for summer camp. In the digital age, application and registration processes have evolved, upgrading from tedious paperwork to efficient online registration. This transformation is easing the registration process for both camps and parents alike, saving on time and cost, and taking efficiency to new heights. That’s where the concept of an online summer camp registration form comes into the picture.
So, what is a camp registration form and why is it of utmost importance?
A summer camp registration form is a standardized, well-structured document that facilitates the collection of required information from potential campers. This is not just about jotting down the name of the camper or identifying which camp session they want to enroll in, but it encompasses a variety of other necessary information. These forms need to capture details such as parents’ contact information, medical history, necessary immunization records, and any relevant health information. Additionally, these forms may also ask for personal information about the camper and any additional support they may require during their camp experience.
Having a well-crafted registration form is vital for summer camps as it lets them collate and manage camper information efficiently. A good registration form should be simple to comprehend, easy to fill out, and should compile all essential information in an organized manner.
But, creating such a meticulous document can be a real challenge. That’s where Regpack comes in. You can design and build online registration forms that are not only user-friendly and highly functional but also comprehensive and secure. But, more on that later. Let’s understand more about what these online registration forms bring to the table.
Nowadays, whatever type of summer camp you’re running, providing a smooth online registration process for campers and their families is a critical precondition for success.
And having a clear and user-friendly camp registration form on your website is one of the key ingredients for getting more registrations and generating more cash flow.
In this article, we’ll cover the six steps needed to create camp registration forms that meet the high expectations of today’s users.
Choose the Right Tool to Create the Form With
The first step in creating a registration form on your website is choosing the right software tool for the job.
Software solutions designed with camps and similar events in mind focus on digitizing, automating, and streamlining all registration and payment processes. Those solutions aim to integrate the three core components of effective camp management.
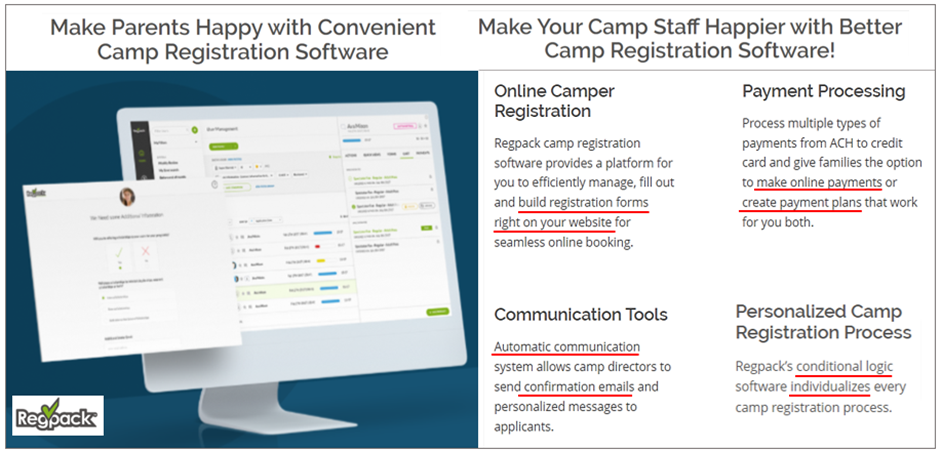
Integrating registration and payment processing in one software solution provides a more cohesive user experience, where parents never have to leave your website to complete camp registration and payment.
 Source: Regpack
The above highlights show how Regpack addresses many common pain points in the registration process.
 Source: Regpack
Since most other camp registration solutions cover similar form-building steps, we’ll use Regpack’s form setup procedure as an example of what creating a registration form with integrated payment options on your website involves in practice.
Therefore, you’ll first need to select a cloud-based, user-friendly, all-in-one camp registration software that fits your organization’s needs and budget.
After you complete your software provider’s sign-up, payment, activation, and setup processes, you can log into your user account.
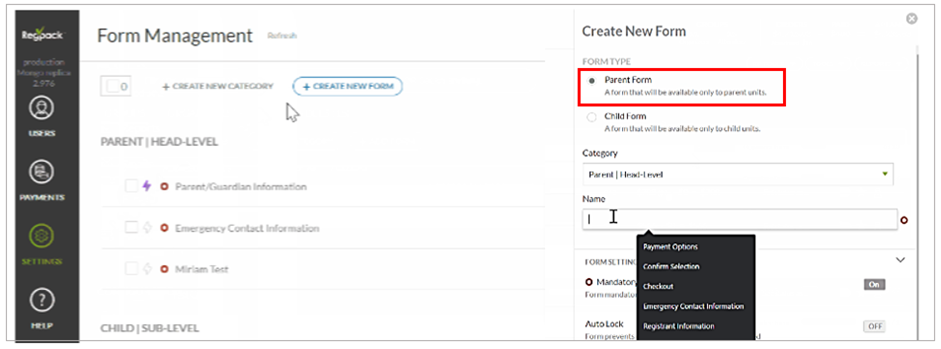
From there, you can go to settings and forms (or similarly named icons), and create a new registration form.
Create a New Registration Form
When creating a brand-new form, you should select the initial form settings (category, name, etc.) and customize the form’s appearance to align with your camp’s branding and design preferences.
 Source: Regpack
This individual child section of your online form will collect specific information about each camper (such as their medical history, dietary preferences, program selections, etc.)
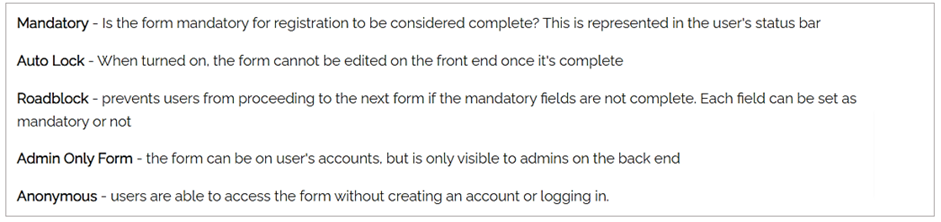
There are some other form settings you’ll need to decide on, some of which are nicely explained here:
 Source: Regpack
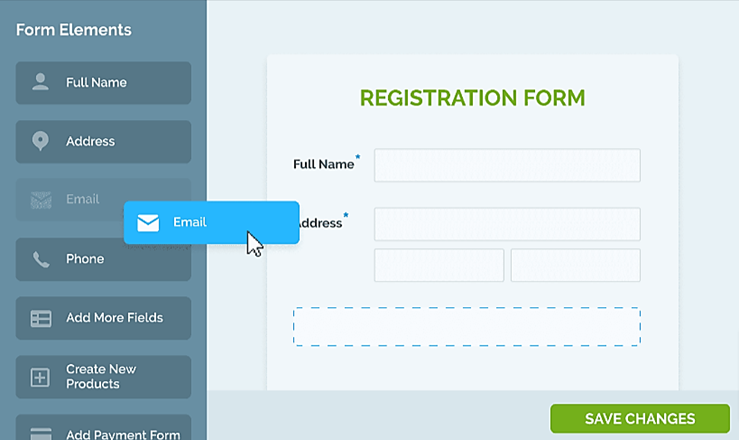
Add the Form Fields You Want to Have
Now that you’ve configured the initial form settings, it’s time to decide what information about campers and parents you want to collect.
Then, simply drag and drop to add, customize, and arrange the desired form fields using your software’s online form builder.
 Source: Regpack
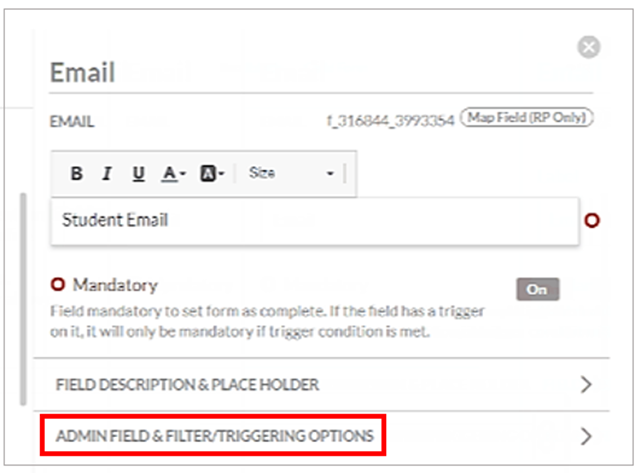
After adding the desired form fields and completing the initial customization, administrators can easily rearrange them to create a logical and user-friendly layout before integrating payments into their camp registration form.
 Source: Regpack
Integrate Payments Into Your Form
This step ensures that, after camper parents complete the registration info section, they can seamlessly move through your form to select the preferred camp payment options and methods and pay for camp.
This integration enables parents to complete their registration and make payments within a single, cohesive workflow, eliminating the need for redirecting them from your website to third-party payment gateways.
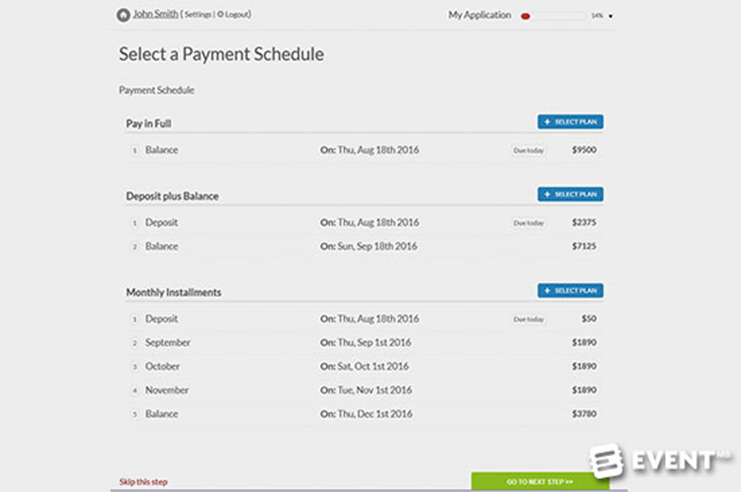
In an integrated payment process, after the campers and their parents select the camp program and session dates and fill out other mandatory info, they can choose how they want to pay for camp, i.e., select a payment plan/schedule.
 Source: Regpack
After selecting a payment schedule (e.g., one-time payment, deposit plus balance, installment plan), registrants proceed to choose their preferred payment method.
 Source: Regpack
By integrating payments directly into the registration form, the right software allows camps to securely collect online payments on their website, creating a seamless and convenient camp registration and payment process.
At the same time, such integrated solutions offer support features such as automated billing, invoicing, and email communication, managing discounts and coupons, and payment reporting.
Add Triggers to Your Registration Form
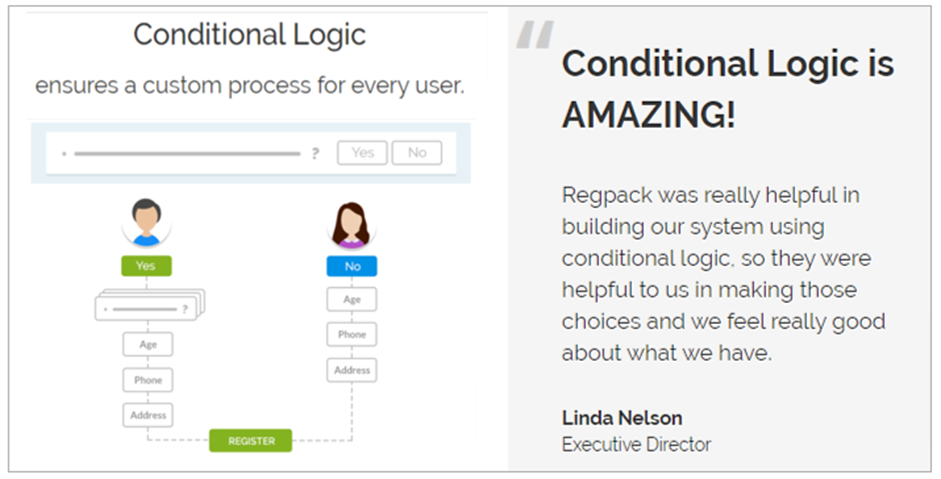
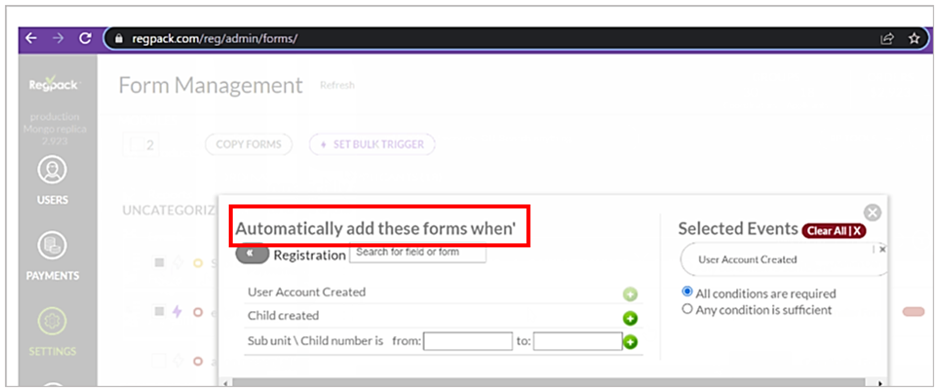
Now that all the form configurations, appearance, and data fields (along with payment options and methods) are set, you can integrate them into one continuous, intuitive registration process by adding conditional triggers to your registration form.
For example, the first trigger you’ll set is for the software to automatically add your parent registration form when a (family/group) user creates a new account and your child form when they come to the child info section.
 Source: Regpack
Here is a short video that shows how to trigger conditional logic for forms.
Source: Regpack on YouTube
Embed the Registration Form on Your Website
Once your registration form is built, payments integrated, and triggers set, you can embed it on your website.
Just consider that, according to a study by The Manifest, 29% of users will abandon an online registration process due to security concerns.
Another 27% will do so because the form is too long (and/or repetitive).
 Illustration: Regpack / Data: The Manifest
In light of this, being able to embed the registration form on your website with a single line of HTML code gives users peace of mind in terms of online data security, shortens the registration process, and makes the entire user experience more convenient.
 Source: Regpack
In fact, studies have shown that when everything happens in one place (your website), this can increase the camper conversion rate by 27%.
Advantages of Regpack’s Summer Camp Registration Form
The camp registration form is the first point of interaction between the summer camp and the camper. An expertly designed form not only streamlines the collection of necessary information but also leaves a good first impression. Recognizing this, Regpack is consistently working to enhance the online registration process by using our expertise in designing efficient and effective summer camp registration forms.
Let’s take a more in-depth look into how Regpack’s forms function.
One of the best things about our forms is that we take data collection seriously. Our registration forms are designed to capture all necessary camper details, from fundamental information like the camper’s name and contact information to more personal information. This includes medical history and health information that are crucial for ensuring the camper’s well-being during the camp session.
What sets our forms apart is how we integrate additional features into the registration process. Parents can sign up for multiple camp sessions simultaneously, and choose whether they’re enrolling for a day camp, adventure camp, or a theme camp – we have it all organized in our interface. Information about the location, the camp staff, and a comprehensive view of what to expect during the camp session can also be found.
But there’s more to our system than just the data collection. We are aware that payment can often be a hurdle in such processes. To address this, we have built-in credit and debit card payment options in our form. Parents can complete the payment while filling out the summer camp registration form, making the process smooth and hassle-free. Moreover, post-registration, a confirmation email goes out automatically, creating a seamless communication flow between the camp and the camper.
Leveraging our industry knowledge and technical prowess, we have successfully designed a system that puts convenience, efficiency, and functionality at the forefront. Now that we’ve understood these advantages, let’s dive deeper and explore step by step how to utilize our summer camp registration form for an effortless registration experience.
Conclusion
In essence, a top-notch summer camp registration process makes all the difference, not just for the camp organizers but also for parents and campers. From the initial online registration to the detailed information assortment, each phase plays an integral role in setting the tone for the upcoming exciting summer camp adventure.
Regpack understands this importance, and our commitment to providing an easy and hassle-free registration experience remains steadfast. Through our comprehensive, user-friendly, and efficient online summer camp registration form, we aim to streamline the path leading up to a fun-filled summer adventure. We endeavor to make the process smooth, safe, and straightforward for our customers, drawing from our extensive experience and advanced technical expertise.
Our dedication lies in ensuring that all you need to worry about is packing your bags and embarking on your summer adventure. Leave the intricacies of registration, payment, and documentation to us!
See you at camp!
References:
“6 Steps to Avoid Online Form Abandonment” The Manifest,
https://themanifest.com/web-design/blog/6-steps-avoid-online-form-abandonment. Accessed September 13, 2023.
“Cloud Computing” Tech Target, https://www.techtarget.com/searchcloudcomputing/definition/cloud-computing. Accessed September 13, 2023.